

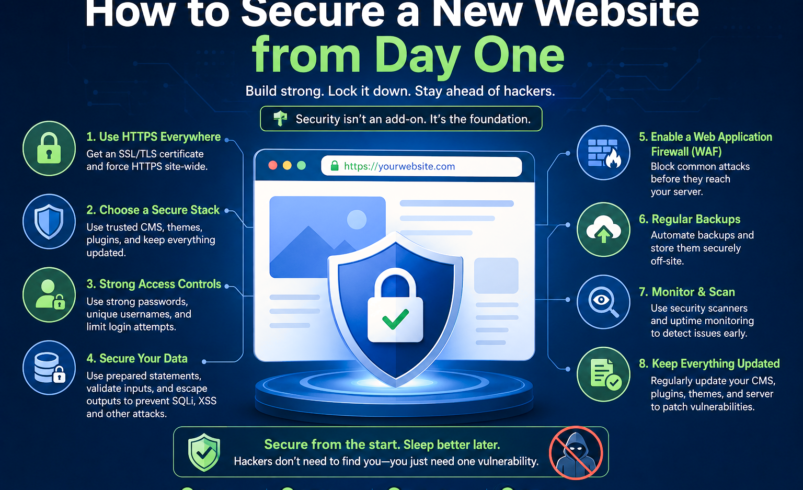

Launching a new website is exciting. You’ve chosen your domain, set up hosting, installed WordPress (or your CMS of choice), and you’re ready to start building. Security is probably the last thing on your mind right now — and that’s exactly when it matters most.
Here’s the uncomfortable truth: new websites become discoverable by search engines and bots within hours of going live. Vulnerability scanners run continuously across the entire internet. The moment your site is accessible, it’s being probed.
The good news? Setting up proper security from day one is far easier — and less expensive — than recovering from a hack after the fact. This guide walks you through everything you need to do before, during, and immediately after launch to make sure your new website starts its life properly protected.
Why New Websites Are Particularly Vulnerable
Experienced website owners have often learned security lessons the hard way. New website owners haven’t yet — and attackers know it. New sites tend to be vulnerable for several reasons:
- Default CMS configurations often prioritize ease of setup over security
- Plugins are installed quickly during setup without security vetting
- Passwords are often set to something memorable rather than something strong
- Security isn’t configured because ‘there’s nothing on the site yet’
- The site owner doesn’t know what normal looks like, making anomalies hard to spot
The ‘nothing on the site yet’ mindset is particularly dangerous. Hackers don’t care about your content — they care about your server, your domain reputation, and your traffic. A brand new site is just as useful to them as an established one.
Before You Launch: The Security Foundation
1. Choose Hosting That Takes Security Seriously
Not all hosting is equal. Before committing to a provider, check whether they offer: account isolation on shared hosting (so neighboring accounts can’t affect yours), server-level malware scanning, automatic backups, ModSecurity or similar WAF at the server level, and a responsive support team for security incidents.
Cheap hosting often means shared environments with poor isolation, outdated server software, and minimal security monitoring. For a business website, the extra cost of reputable hosting is always worth it.
2. Install SSL Before Anything Else
Your site should launch on HTTPS from day one — not HTTP with a plan to add SSL later. Most reputable hosting providers offer free SSL certificates via Let’s Encrypt with one-click installation. Set it up before you add any content, configure any plugins, or share the URL with anyone.
Launching on HTTP and migrating to HTTPS later creates unnecessary technical complications and means your site was insecure during its initial indexing by search engines.
3. Set Strong Credentials from the Start
During CMS installation, you’ll be asked to create an admin username and password. This is the moment most security mistakes are made:
- Never use ‘admin’ as your username — it’s the first credential every bot tries
- Use a randomly generated password of at least 16 characters — use a password manager
- Use a unique email address for the admin account that isn’t publicly visible on your site
- Enable two-factor authentication immediately after your first login
4. Choose Plugins and Themes Carefully
Every plugin you install during setup is a potential attack surface. Before installing any plugin:
- Check when it was last updated — avoid anything over 12 months without an update
- Check the active install count and review ratings
- Only install plugins from the official WordPress repository or directly from reputable premium developers
- Never install nulled (pirated) plugins or themes — they’re a primary vector for pre-installed malware
- Install only what you actually need — every extra plugin is additional risk
5. Delete Everything You Don’t Need
Fresh WordPress installations come with default themes (Twenty Twenty-Three, Twenty Twenty-Four) and sample content. Delete the themes you’re not using, remove the sample posts and pages, and delete the Hello Dolly plugin if present. These defaults are fingerprinting targets and serve no useful purpose on a live site.
6. Configure File Permissions Correctly
File permission settings control who can read, write, and execute files on your server. Incorrect permissions — particularly overly permissive settings — are a common security weakness. Standard WordPress permission settings:
- Directories: 755 (owner can write, others can only read and execute)
- Files: 644 (owner can write, others can only read)
- wp-config.php: 600 or 640 (only owner can read — this file contains your database credentials)
Your hosting control panel’s file manager typically shows current permissions, and your host’s support team can advise on the correct settings for your specific environment.
At Launch: Active Protection
7. Deploy a Web Application Firewall
A WAF should be in place before your site goes live — not added as an afterthought if something goes wrong. A cloud-based WAF routes your traffic through a security filter before it reaches your server, blocking SQL injection, XSS, brute force attacks, and known exploit attempts automatically.
Sucuri’s WAF is set up via a simple DNS change that takes minutes. Once active, it begins filtering traffic immediately — protecting your site from the moment the first visitor arrives, including the bots that will find you within hours of launch.
8. Set Up Malware Monitoring
Continuous malware monitoring scans your website files and database on an ongoing basis, alerting you immediately if anything suspicious is detected. For a new site, this is especially valuable — it establishes a baseline of what ‘clean’ looks like, making any future changes immediately detectable.
Without monitoring, you’re relying on noticing problems yourself — which, as we’ve covered, is not reliable. Hackers design their malware to be invisible to site owners.
9. Configure Automated Backups
Set up automated daily backups before your site has any meaningful content — not after. Configure backups to store offsite (Google Drive, Dropbox, Amazon S3) rather than only on your hosting server. Test the restoration process once so you know it works.
A backup from day two of your site’s life is infinitely more valuable than no backup at all when something goes wrong six months later.
10. Register with Google Search Console
Google Search Console is free and gives you visibility into how Google sees your site — including any security issues it detects. Register your site on launch day and verify ownership. If Google ever detects malware or spam on your site, you’ll be notified here before most other channels.
It also gives you the mechanism to request a review after any blacklisting event — which you want to have set up and ready, not be scrambling to configure during a crisis.
11. Enable Blacklist Monitoring
Your domain can be flagged by Google, McAfee, Norton, Spamhaus, and other security databases — sometimes within days of a new site launching if it’s compromised early. Blacklist monitoring watches all major databases and alerts you the moment your domain is flagged.
For a new site, early blacklisting is particularly damaging — it affects your domain’s reputation from the start, impacting both SEO and email deliverability before you’ve had a chance to build either.
Ongoing: Building Good Security Habits
Security isn’t a one-time setup — it’s an ongoing practice. Build these habits from the start:
- Update everything weekly: CMS core, all plugins, all themes — as soon as updates are available
- Review user accounts monthly: Remove accounts that are no longer needed, check for unexpected additions
- Check Google Search Console weekly: Especially the Security Issues section
- Review your plugin list quarterly: Remove anything unused, replace anything abandoned
- Test your backups: Verify at least quarterly that your backups are complete and restorable
Your New Site Security Launch Checklist
Task | Priority | When to Do It |
Choose a reputable hosting provider | 🔴 Critical | Before launch |
Install SSL certificate (HTTPS) | 🔴 Critical | Before launch |
Set strong unique admin passwords | 🔴 Critical | Before launch |
Enable two-factor authentication | 🔴 Critical | Before launch |
Remove all default/demo content | 🟠 High | Before launch |
Delete unused themes and plugins | 🟠 High | Before launch |
Configure automated daily backups | 🟠 High | Before launch |
Install a Web Application Firewall | 🟠 High | Before launch |
Set up malware monitoring | 🟠 High | Before launch |
Register with Google Search Console | 🟡 Medium | At launch |
Harden file permissions | 🟡 Medium | Before launch |
Limit login attempts | 🟡 Medium | Before launch |
Hide CMS version information | 🟡 Medium | Before launch |
Set up blacklist monitoring | 🟡 Medium | At launch |
The Cost of Getting This Right from Day One
Setting up proper security for a new website takes a few hours and a modest ongoing investment. Compare that to the alternative: a hacked site within weeks of launch, damaged domain reputation before you’ve even had a chance to build it, emergency cleanup costs, and the psychological toll of dealing with a security incident while you’re still trying to get your business off the ground.
The businesses that treat security as a launch requirement — not an afterthought — are the ones that don’t have to tell their customers their data was compromised, or explain to Google why their new site was serving malware.
Sucuri‘s platform is the most efficient way to cover the active security layer of your new site launch — WAF protection, continuous malware monitoring, blacklist monitoring across all major databases, and guaranteed malware removal if anything ever gets through. Set it up once and it runs continuously in the background, letting you focus on growing your site rather than worrying about who’s trying to break into it.
🚀 Launching a new website? Start it right. Set up Sucuri security from day one — WAF protection, malware monitoring, blacklist alerts, and expert backup from the moment your first visitor arrives.
The best time to secure your website is before you need it. That time is right now — before launch, before the bots find you, and before a preventable incident becomes an expensive crisis.

2 Comments
-
I appreciate how this post highlights the importance of securing a website from day one. Even small oversights early on can create vulnerabilities that are much harder to fix later, so thinking about basic security right at launch really pays off.
-
Thanks for your valuable feedback.
-